Archive

Archive for the ‘PowerShell’ Category

Changelog: Install-OfficeWebAppsLanguagePacks.ps1

March 7th, 2015 No comments

This is the changelog page for Script: Install-OfficeWebAppsLanguagePacks.ps1 – Easier Installation of Selected Language Packs. You will find a complete list of released versions, their dates, and the features and issues addressed in each. Please refer to the script’s main page for more information including download links, installation details, and more.

v1.0 – 03-07-2015

  1. Initial version
Categories: PowerShell Tags:

One Liner: Set-TaskbarGrouping – Configure Desktop Taskbar Grouping

February 18th, 2015 No comments

In One Liner: Configuring Shutdown Tracker in Windows Server I mentioned that it’s often preferable to quickly configure some server settings when building servers. As a consultant, I like to set up my server profile when building servers in a manner that’s efficient and convenient for me. One thing that drives me completely insane is the default taskbar group setting. Taskbar grouping is how Windows groups common items together on the taskbar. By default, all similar items are lumped together, i.e. all Internet Explorer windows. So to go back to an IE window could take two mouse clicks instead of one. Let’s take a look at streamlining this configuration for Server 2012 and Server 2012 R2.

Taskbar grouping has three settings. The default “always combine” mentioned previously, “combine when taskbar full” which doesn’t start grouping until there are enough items to fill the taskbar, and my favorite, “never combine”. As you can probably guess, “never combine” doesn’t group taskbar items at all. Since I usually don’t have more than 4 or 5 apps open when building servers, this suits my style.

Just like the shutdown tracker, this setting is stored in the registry. A one liner for this would look like this:

Set-ItemProperty -Path 'HKCU:\Software\Microsoft\Windows\CurrentVersion\Explorer\Advanced' -Name TaskbarGlomLevel -Value 0

0 is the value for “always combine”, 1 for “combine when taskbar full” and 2 for “never combine”. In order for the setting to take effect, one of two things has to happen. Either log off/restart, or restart the explorer.exe process. The later can be performed by running the following:

Stop-Process -ProcessName explorer -force

If you’d like to use a function for this, we can use something like the code below in our server build script:

function Set-TaskbarGrouping {
    [CmdletBinding(SupportsShouldProcess, SupportsPaging, DefaultParameterSetName = 'NeverCombine')]
    param(
        # Always combines similar shortcuts into groups
        [Parameter(ValueFromPipelineByPropertyName, ParameterSetName = 'AlwaysCombine')]        
        [switch] $AlwaysCombine,
        
        # Combines similar shortcuts into groups only when the taskbar is full
        [Parameter(ValueFromPipelineByPropertyName, ParameterSetName = 'CombineWhenTaskbarFull')]
        [switch] $CombineWhenTaskbarFull,
        
        # Never combines similar shortcuts into groups
        [Parameter(ValueFromPipelineByPropertyName, ParameterSetName = 'NeverCombine')]
        [switch] $NeverCombine,
        
        # Restarts explorer in order for the grouping setting to immediately take effect. If not specified, the change will take effect after the computer is restarted
        [switch] $NoReboot
    )
    switch ($PsCmdlet.ParameterSetName) {
        'AlwaysCombine' {
            Set-ItemProperty -Path 'HKCU:\Software\Microsoft\Windows\CurrentVersion\Explorer\Advanced' -Name TaskbarGlomLevel -Value 0
        }
        'CombineWhenTaskbarFull' {
            Set-ItemProperty -Path 'HKCU:\Software\Microsoft\Windows\CurrentVersion\Explorer\Advanced' -Name TaskbarGlomLevel -Value 1
        }
        'NeverCombine' {
            Set-ItemProperty -Path 'HKCU:\Software\Microsoft\Windows\CurrentVersion\Explorer\Advanced' -Name TaskbarGlomLevel -Value 2
        }
    }
    if ($NoReboot){
        Stop-Process -Name explorer -Force
    }else{
        Write-Verbose -Message 'Change will take effect after the computer is restarted'
    }
} # end function Set-TaskbarGrouping

I use parameter set names so that only one of the parameters can be used when the function is called. The three options are “NeverCombine” “CombineWhenTaskbarFull” and “AlwaysCombine”. But since I define the parameters in a param block, you get tab completion. So no need to even remember the options. For example:

Set-TaskbarGrouping -NeverCombine

If you also include the -NoReboot parameter when calling the function, it will restart explorer.exe to avoid the need to log off/restart.

One Liner: Configuring Shutdown Tracker in Windows Server

February 17th, 2015 3 comments

When you spend time building servers, there are often some minor tweaks that you use to make life easier. In many environments, Group Policy Objects (GPOs) are used to configure these settings. But in a lot of environments, that’s not the case. If you build a lot of servers, you may have some scripts to help streamline the process. I often see this being the case among consultants who are engaged to deploy a solution. If you’ve followed my blog for a while, you know that’s what I do. And I look for many ways to streamline the deployment. Many solutions I write are all about the actual deployment, whereas this particular post is about the working environment I’ll be spending time in.

One thing that always drives me nuts is the Shutdown Tracker. That’s the little dialog box that pops up when you want to restart or shutdown a server. You’re presented with a prompt to pick the reason why you’re restarting or shutting down. While this can certainly have its place in an enterprise environment, it’s not generally needed during a deployment. And it’s not likely needed in a lab environment where you might be testing various configurations and restarting often. So let’s gag that annoying prompt.

To disable Shutdown Tracker, open an elevated PowerShell prompt and enter the following one line:

Set-ItemProperty -Path "HKLM:\SOFTWARE\Policies\Microsoft\Windows NT\Reliability" -Name ShutdownReasonOn -Value 0

This will take care of the problem. If you later want to enable the Shutdown Tracker, you can simply run it again, specifying a 1 for the value.

We can make this a little more flexible by creating a function to let us enable or disable as needed.

function Set-ShutdownTracker {
	[CmdletBinding(SupportsShouldProcess = $True, SupportsPaging = $True, DefaultParameterSetName = "disabled")]
	param(
		# Disable the shutdown tracker
		[Parameter(ValueFromPipeline = $False, ValueFromPipelineByPropertyName = $True, ParameterSetName = "disabled")]
		[switch] $Disabled,
		
		# Enable the shutdown tracker
		[Parameter(ValueFromPipeline = $False, ValueFromPipelineByPropertyName = $True, ParameterSetName = "enabled")]
		[switch] $Enabled
	)
	switch ($PsCmdlet.ParameterSetName) {
		"enabled" {
			Set-ItemProperty -Path "HKLM:\SOFTWARE\Policies\Microsoft\Windows NT\Reliability" -Name ShutdownReasonOn -Value 1
		}
		"disabled" {
			Set-ItemProperty -Path "HKLM:\SOFTWARE\Policies\Microsoft\Windows NT\Reliability" -Name ShutdownReasonOn -Value 0
		}
	}
} # end function Set-ShutdownTracker

And the script can be called with either the -Enabled or -Disabled parameters.

Adding the one liners or the function to your deployment scripts might make life a little easier.

Creating Desktop Shortcuts to Run PowerShell Scripts

February 16th, 2015 1 comment

PowerShell-logo-128x84Description

There are some really helpful scripts out there. Not just for Lync and Exchange. But many other apps and administrative tasks. Sometimes, however, the people who need to run them aren’t well versed in PowerShell. This makes is cumbersome for them to open PowerShell, navigate to a folder containing a script, and execute it with the correct parameters. This often leads to complaints about the difficulty of the process, or those admins just not using that tool. As not all admins have our PowerShell prowess, we can create a desktop shortcut that will allow an admin to simply double-click on it to execute it. Let’s see an example.

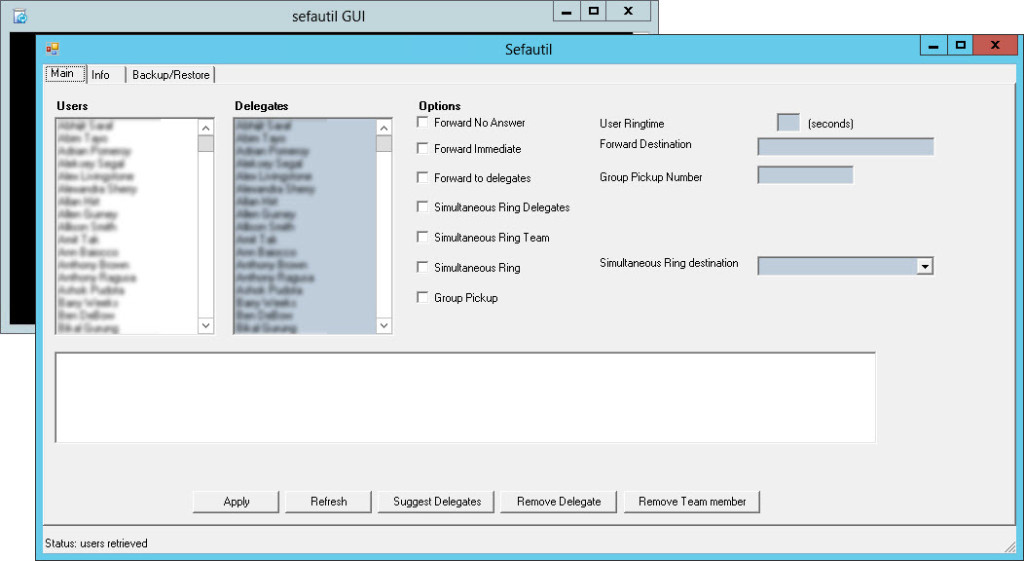
For this example, I’m going to use Johan Veldhuis’ very slick sefautil GUI, a wrapper for the Lync sefautil.exe program. Sefautil is a resource kit utility that allows an admin to set things like delegates, call forwarding, and other settings, on behalf of users. Sefautil has some really painful syntax, and a complete lack of error reporting. Using it is often frustrating. Johan’s GUI for it makes life SO much easier, that I found myself using it a LOT.

Let’s say, for the sake of this example, that the script, called sefautil_gui.ps1, is in a folder called c:\_scripts. When you execute Johan’s script, you must pass it a front end pool name using the “-pool” parameter. Normally running it would require something like the following:

.\sefautil_gui.ps1 -pool pool01.contoso.com

With a shortcut, we need to tell it to launch PowerShell, and call the script along with the parameters. The syntax is the full path to powershell.exe, along with the “-command” parameter and the syntax used for the script. The syntax is wrapped in quotes, and prefixed with an ampersand. PowerShell resides at C:\Windows\System32\WindowsPowerShell\v1.0\powershell.exe

  1. Right click on the desktop, and choose New>Shortcut.
  2. Enter a path for the shortcut. For our example, we’ll use
    C:\Windows\System32\WindowsPowerShell\v1.0\powershell.exe -command “& c:\_scripts\sefautil_gui.ps1 -pool pool01.contoso.com”
  3. Click Next.
  4. Give the shortcut a name. We’ll call it “sefautil GUI”. Then click Finish.

Let’s set the starting path. Right click on the newly created shortcut, and click Properties. Click on the Shortcut tab. In the “Start In” field, let’s set it to “C:\windows\system32\WindowsPowerShell\v1.0”.

You may have noticed that the shortcut has the PowerShell icon. While that’s all fine and damn sexy, we might want to change that. That’s simple enough since we’re already on the Shortcut tab, click the Change Icon at the bottom and choose whichever icon you’d like. For mine, I chose the Deployment Wizard icon. This is available by browsing to %ProgramFiles%\Microsoft Lync Server 2013\Deployment and choosing Bootstrapper.exe.

While Johan’s script is a GUI based script, many are not. If that’s the case, we can tweak the session settings a little further. On the Options tab of the shortcut, you can tailor settings like Quick Edit mode, which makes selecting, copying, and pasting easier. Obviously, the Font, Layout, and other tabs provide further control over the experience.

Also note that non-GUI scripts will close the PowerShell window when they are done running, so a script might need to be tweaked to pause before closing. YMMV.

Once you’re done, click OK. Voila!

sefautil GUI shortcut

Now, simply double clicking on our new shortcut launches the script.

sefautil GUI


I often do this for many 3rd party administrative tools, including Lync Call Pickup Group Manager, Lync RGS Holiday Set Editor, Centralized Logging Tool, and more.

Donations

I’ve never been one to really solicit donations for my work. My offerings are created because *I* need to solve a problem, and once I do, it makes sense to offer the results of my work to the public. I mean, let’s face it: I can’t be the only one with that particular issue, right? Quite often, to my surprise, I’m asked why I don’t have a “donate” button so people can donate a few bucks. I’ve never really put much thought into it. But those inquiries are coming more often now, so I’m yielding to them. If you’d like to donate, you can send a few bucks via PayPal at https://www.paypal.me/PatRichard. Money collected from that will go to the costs of my website (hosting and domain names), as well as to my home lab.

Categories: PowerShell Tags: ,

Changelog: New-SignedScript

June 10th, 2014 No comments

This is the changelog page for New-SignedScript. You will find a complete list of released versions, their dates, and the features and issues addressed in each. Please refer to the script’s main page for more information including download links, installation details, and more.

v1.3 – 09-18-2016

  1. Now includes a selection box when more than one valid code signing certificate is found.

v1.1 – 06-10-2014

  1. Better handling when there is more than one code signing cert. Script now finds the first valid code signing cert and uses that.
  2. Better validation that the script is successfully signed

v1.0 – 09-20-2012

  1. Initial version
Categories: PowerShell Tags: , ,

Module: ExchangeServices – Functions to stop/start/query Exchange services

April 1st, 2014 1 comment

Description

Exchange 2013 logo 128x128Being someone who’s converted from Exchange to Lync, I have the luxury of cmdlets for managing Lync services. This includes starting, stopping, and querying those services. I’ve heard from a few Exchange guys who have said it would be nice if the Exchange guys had the same ability. Sure, you can manually type a PowerShell query each time, but why not convert that into some functions? I’ve created a module that has three functions in it. Start-ExWindowsService, which will start any Exchange service that is not disabled and not currently running. Stop-ExWindowsService will stop all running Exchange services. Get-ExWindowsService, which will display all Exchange services and their status and startup type. And finally, Set-ExWindowsServiceRecoveryOptions sets all Exchange related services to automatically restart in the event of a service failure.


Syntax

Start-ExWindowsService [[-ComputerName] ] [[-Name] ] [-WhatIf] [-Confirm] []
Stop-ExWindowsService [[-ComputerName] ] [[-Name] ] [-Force] [-WhatIf] [-Confirm] []
Get-ExWindowsService [[-ComputerName] ] [[-Name] ] [-WhatIf] [-Confirm ] []
Set-ExWindowsServiceRecoveryOptions [[-ComputerName] ] [-WhatIf] [-Confirm]

Installation

Open PowerShell and type $env:PSModulePath. Note that it will generally include two paths. One is to c:\Windows\System32\WindowsPowerShell\v1.0\Modules\. Placing the module in this location will make it available to everyone who uses that computer. The other path is to a subfolder of your My Documents folder. Something like C:\Users\administrator\Documents\WindowsPowerShell\Modules. Placing the module in there will make it available just to you. In either case, unzip the contents of the zip file, including the folder, to the modules folder. One thing to note: if you place the module in your personal modules folder, it will not show in the list when you run Get-Module -ListAvailable. But it will still work fine. Import the module by typing Import-Module ExchangeServices

Download

v1.1 – 01-26-2015 – ExchangeServices.v1.1.zip

v1.0 – 04-01-2014 – ExchangeServices.v1.0.zip

Changelog

See the changelog for information on what’s changed/included in each version.


Categories: Exchange Server, PowerShell Tags:

New Syntax Highlighting and Auto-Complete Files for UltraEdit includes PowerShell v4, AD, Lync 2013, and Exchange 2013

March 12th, 2014 No comments

Syntax highlighting

Updated the wordfile a little bit. This one includes all previous functions as well as the following:

  1. PowerShell v4 cmdlets (the ones available when you open a new v4 session).
  2. Exchange 2013 SP1 cmdlets
  3. Lync 2013 cmdlets
  4. Active Directory cmdlets

That adds up to 2834 cmdlets/functions that get syntax highlighting on top of the 137 aliases that are also in the file. The file also has variable highlighting, as well as operators and comp operators highlighting.

Formatting changes include the following:

  1. code folding for (), so your long param() blocks can now be collapsed/expanded.
  2. code folding for region/endregion. This mimics the behavior of ISE.

If you’d like to change the colors and/or fonts used for highlighting, go to View>Themes>Manage Themes, or Layout>Themes>Manage Themes (depending on your version of UltraEdit) as the styling in the wordfile is ignored starting with v20 of UltraEdit.

manage themes

As with all other wordfiles, they are stored in “%appdata%\IDMComp\UltraEdit\Wordfiles\”, unless you change the path in Advanced>Configuration>Editor Display>Syntax Highlighting or Advanced>Settings>Editor Display>Syntax Highlighting (again, depending on your installed version of UltraEdit).

wordfile path

You can optionally set the “Highlight new file as:” to PowerShell, as I do (also shown above).

As soon as you place this wordfile in that folder, you should see PowerShell as an option under View>View as (Highlighting File Type)

view as highlighting

Auto-complete

I’ve also created an auto complete file that contains the same cmdlet/function names as the syntax highlighting file. When enabled, you get tab completion of cmdlet and function names similar to the PowerShell console and ISE. Note, however, that in UltraEdit, you only get auto-complete of the cmdlet/function names, not their parameters.

You can save the file anywhere. Then, go to Advanced>Configuration>Editor>Word Wrap/Tab Settings (or Advanced>Settings>Editor>Word Wrap/Tab Settings) to specify the location within UltraEdit:

auto-complete path

Then go to Auto-complete and check the box “Show auto-complete dialog automatically” and also enter a number in the box. 5 works for me.

auto-complete options

Now, when typing a cmdlet/function that’s in the auto-complete file, you’ll get suggestions.

auto-complete suggestions

Up/down errors navigate through the list, and tab uses the highlighted suggestion.

Download

UltraEditSyntaxHighlighingAuto-CompleteFiles.zip

Function: Set-PowerPlan – Adjust The Power Plan of a Server

February 25th, 2014 2 comments

Description

Just something I worked up based on a suggestion by someone. This will change the power plan of the machine it’s run on. This can be critical if you want to ensure that the machine doesn’t go to sleep while an extended process is running. Simply run the function with the desired power plan and the change is immediate. For example:

Set-PowerPlan "High Performance"

The three power plans you can choose from are “high performance”, “balanced”, and Power Saver. That’s all there is to it.

function Set-PowerPlan {
	[CmdletBinding(SupportsShouldProcess = $True)]
	param (
		[ValidateSet("High performance", "Balanced", "Power saver")]
		[ValidateNotNullOrEmpty()]
		[string] $PreferredPlan = "High Performance"
	)
	 
	Write-Verbose "Setting power plan to `"$PreferredPlan`""
	$guid = (Get-WmiObject -Class Win32_PowerPlan -Namespace root\cimv2\power -Filter "ElementName='$PreferredPlan'").InstanceID.ToString()
	$regex = [regex]"{(.*?)}$"
	$plan = $regex.Match($guid).groups[1].value 
	
	powercfg -S $plan
	$Output = "Power plan set to "
	$Output += "`"" + ((Get-WmiObject -Class Win32_PowerPlan -Namespace root\cimv2\power -Filter "IsActive='$True'").ElementName) + "`""
	Write-Verbose $Output
}

Donations

I’ve never been one to really solicit donations for my work. My offerings are created because *I* need to solve a problem, and once I do, it makes sense to offer the results of my work to the public. I mean, let’s face it: I can’t be the only one with that particular issue, right? Quite often, to my surprise, I’m asked why I don’t have a “donate” button so people can donate a few bucks. I’ve never really put much thought into it. But those inquiries are coming more often now, so I’m yielding to them. If you’d like to donate, you can send a few bucks via PayPal at https://www.paypal.me/PatRichard. Money collected from that will go to the costs of my website (hosting and domain names), as well as to my home lab.

Categories: PowerShell Tags: ,

Function: New-TrustedIESite – Add URLs to IE’s Security Zones

February 8th, 2014 3 comments

Description

This function probably doesn’t have a lot of users to most people. But in Lync, adding the Simple URL for the Lync Server Control Panel to the Local Intranet zone resolves the issue of having to enter credentials each time. Of course, I like to automate the configuration of things, so I whipped up this little function, and it will be included in some of my build scripts. The script basically creates the required registry entries under HKCU:\Software\Microsoft\Windows\CurrentVersion\Internet Settings\ZoneMap\Domains. Immediately after running the function, we can see the new entry in Internet Explorer

Internet Explorer Trusted Intranet Zone

Internet Explorer Trusted Intranet Zone

Syntax

New-TrustedIESite [[-url] ] [[-zone] ] []

Zones are as follows:

1 Local Intranet
2 Trusted Sites
3 Internet
4 Restricted Sites

example:

New-TrustedIESite -url https://lyncadmin.contoso.com -zone 1

Will add https://www.lyncadmin.contoso.com to the Local Intranet zone

Download

v1.0 – 02-08-2014 – New-TrustedIESite.v1.0.zip

One liners: Get the Top 5 Errors From An Event Log

July 30th, 2013 1 comment

Powershell_logo-137x137As part of an Active Directory Health Check (think “ADRAP”), I needed to document the top errors and warnings in several event logs, including the System, Application, DNS, Directory Service, FRS, and others. This list also needed to include the source of the errors. Since there were a bunch of domain controllers, I didn’t want to spend all day manually looking through event logs, filtering, etc. PowerShell to the rescue.

Get-EventLog is pretty self explanatory. We tell this command we want to look at the system event log, and we’re only interested in errors. We could look for other event types, too, such as Information, FailureAudit, SuccessAudit, and Warning. Get-EventLog can filter based on dates, usernames, etc.

We then take the output of that, and pipe it to Group-Object (or “Group” for short). We group based on source and eventID. This lumps all of the same events with the same eventID together as one object. This is important, because if there are errors with the same source, but different eventID, we want those listed separately.

Next, we use Sort-Object, or “sort”, to arrange the results into a usable list, with the highest numbers at the top. Since we only need the top 5 in the list for this exercise, Select-Object, or “select”, comes into play. This will return just the number of objects we specify. In this case, that’s 5. Since we pass the -first parameter to this cmdlet, we get the first 5 results that were piped from the previous command. Essentially, the highest 5 objects. And lastly, we display just the count and the name using Format-Table, or “ft”. Since we grouped the source and eventID together, the name will be the name of the source, and the corresponding eventID. The output looks like this:

Count Name
----- ----
  179 Microsoft-Windows-GroupPolicy, 1006
   30 Service Control Manager, 7031
   19 Microsoft-Windows-Hyper-V-Netvsc, 2
   15 Service Control Manager, 7034
   10 Microsoft-Windows-WindowsUpdateClient, 20

Exactly what I was after. The top 5 errors in the system event log, sorted by how many times the error appeared in the log, with the source name and eventID, sorted. The one-liner looks like this:

Get-EventLog -LogName system -EntryType error | Group-Object source,eventid | Sort-Object count -desc | Select-Object -first 5 | Format-Table count,name

We could also strip off the Format-Table stuff, and use Export-Csv to dump the results to a csv file.

Get-EventLog -LogName system -EntryType error | Group-Object source,eventid | Sort-Object count -desc | Select-Object -first 5 | Export-Csv c:\SystemErrors.csv -NoTypeInformation

Pretty straightforward, and fairly quick, as long as your event logs aren’t huge. We can even target remote computers by appending the -ComputerName parameter to the Get-EventLog cmdlet. For example:

Get-EventLog -LogName system -EntryType error -ComputerName mycomputer.contoso.local | Group-Object source,eventid | Sort-Object count -desc | Select-Object -first 5 | Export-Csv c:\SystemErrors.csv -NoTypeInformation


Categories: PowerShell Tags: ,